Customer Service

How to Choose the Right Insulation Membrane?

Choosing the right Insulation Membrane is not a cosmetic decision. It affects heat flow, moisture control, durability, and indoor comfort. A membrane may look excellent on a specification sheet, yet fail when seams are poorly sealed or drainage is ignored.

The International Energy Agency reports that buildings consume roughly 30% of global final energy and produce about 26% of energy-related emissions. These figures make thermal performance a practical design priority, not merely a sustainability slogan. The U.S. Department of Energy also emphasizes continuous insulation and effective air sealing because small gaps can create condensation risks and energy losses. Still, numbers do not tell the whole story. Climate, wall construction, vapor permeability, fire performance, UV exposure, and installation quality must be assessed together.

Building-science expert Joseph Lstiburek reminds practitioners, “The building enclosure is a system.” That principle guides this article. The best Insulation Membrane is not always the thickest, newest, or most expensive product. It must match the substrate and local weather conditions. Check technical data carefully. Examine the joints, corners, penetrations, and fixing method. A membrane that performs well in a laboratory may behave differently on a dusty construction site.

There is no perfect choice.

This guide compares key membrane types, performance indicators, and common installation mistakes. It also questions a frequent assumption: higher stated resistance does not guarantee better real-world protection. Evidence matters, but so does site experience.
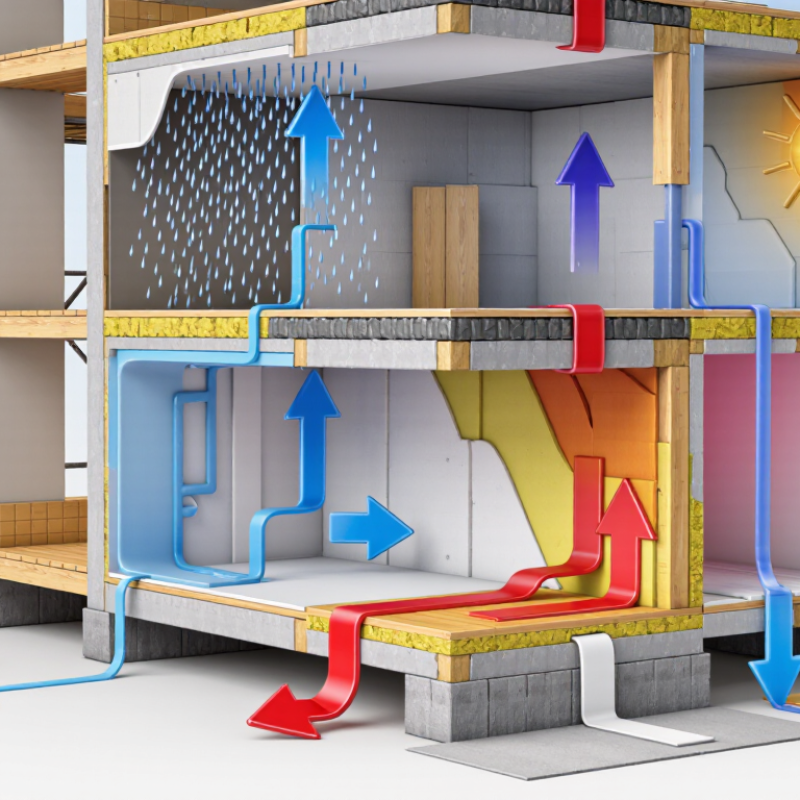
How to Choose the Right Insulation Membrane?

Understanding Insulation Membranes and Their Main Functions

How to Choose the Right Insulation Membrane?

Understanding Insulation Membranes and Their Main Functions

An insulation membrane is a thin protective layer within a wall, roof, or floor assembly. Its job depends on its location and material. Some membranes control water vapor. Others block wind, rain, or unwanted air movement. A suitable membrane helps insulation stay dry and perform consistently.

During site inspections, I have seen damp insulation caused by small gaps around windows and service penetrations. These openings may look harmless. They are not. An airtight membrane can reduce drafts and protect indoor comfort. A vapor-control layer can limit moisture moving into colder parts of a structure. A weather-resistant layer can guide rainwater away from the insulation.

Choosing correctly requires more than comparing thickness. Check the building’s climate, wall design, indoor humidity, and ventilation. Also review the membrane’s tested vapor permeability, air resistance, water resistance, and installation requirements. Local building codes remain essential. A membrane that works well in a cold, dry region may perform poorly in a warm, humid one. I have occasionally focused too much on product data and overlooked complicated junctions. That mistake is worth remembering.

Tips: Draw the wall layers before choosing a membrane. Mark windows, pipes, corners, and electrical outlets. Confirm which side faces indoors. Seal every overlap with compatible materials. Avoid mixing systems without checking technical guidance. If moisture movement is uncertain, consult a qualified building professional.

Identifying Your Building’s Insulation and Environmental Requirements

How to Choose the Right Insulation Membrane?

Identifying Your Building’s Insulation and Environmental Requirements

Choosing an insulation membrane begins with the building’s actual conditions, not a product label. A coastal wall faces wind-driven rain, salt air, and persistent humidity. A basement may face ground moisture and occasional water pressure. These risks require different control layers.

Inspect the wall, roof, or floor assembly before selecting a membrane. Check the insulation type, indoor humidity, seasonal temperatures, and ventilation path. A membrane may control vapor movement, air leakage, or bulk water. It may not perform all three functions equally. Confirm its vapor permeance and air-sealing capacity. Also review local energy and moisture-control requirements.

Small details often decide performance. Seal laps around windows, fasteners, service penetrations, and floor junctions. A membrane can appear continuous while hidden gaps remain behind an outlet box. On cold mornings, those gaps may create condensation inside the assembly. That damage is slow and easy to miss.

The indoor environment matters too. Bathrooms, kitchens, and laundry rooms release more moisture than bedrooms. Mechanical ventilation should support the membrane strategy. In a heating-dominated climate, placing vapor control on the warm side often reduces condensation risk. In mixed climates, that rule can become less reliable. I still reconsider simple rules when the assembly includes air-conditioning, dense insulation, or seasonal humidity swings. A qualified building professional should review unusual assemblies before installation.

How to Choose the Right Insulation Membrane? - Identifying Your Building’s Insulation and Environmental Requirements
Building or Environmental Condition Primary Membrane Function Recommended Vapor Profile Typical Performance Reference Suitable Membrane Characteristics Important Design Considerations
Cold, heating-dominated climate Control interior moisture migration while limiting air leakage Class II or Class III Class II: more than 0.1 and up to 1.0 US perm; Class III: more than 1.0 and up to 10 US perms Continuous air barrier with controlled vapor resistance and sealed laps, penetrations, and edges Place the vapor-control layer on the warm-in-winter side when required by the local code and assembly design. Avoid trapping moisture between two low-permeance layers.
Warm-humid or hot-humid climate Reduce humid outdoor air infiltration and manage inward vapor drive Vapor-open or variable-perm Vapor-open membranes commonly exceed 10 US perms; variable-perm membranes change permeance with relative humidity Exterior water-resistive barrier, reliable air barrier, drainage plane, and inward-drying potential Use a hygrothermal analysis where air conditioning, absorptive cladding, interior polyethylene, or low-permeance insulation could restrict drying.
Mixed-humid climate Balance seasonal drying toward both the interior and exterior Vapor-open or variable-perm Many vapor-open products are above 10 US perms; variable-perm products may range from below 1 perm at high humidity to above 10 perms at lower humidity Moderate vapor control combined with continuous air and water management Confirm the complete wall or roof assembly rather than selecting the membrane by climate zone alone.
Interior high-humidity areas such as kitchens, pools, and laundry spaces Limit vapor diffusion and prevent humid air from entering cold assemblies Class I or Class II Class I: 0.1 US perm or less; Class II: more than 0.1 and up to 1.0 US perm Low-permeance vapor retarder, continuous air sealing, and moisture-resistant surface detailing Provide mechanical dehumidification and exhaust ventilation. A low-permeance layer should not be installed on both sides unless drying has been demonstrated.
Wind-driven rain or exposed above-grade exterior walls Stop bulk water while allowing incidental moisture to drain and assemblies to dry Usually vapor-open Water-resistive barrier testing commonly includes hydrostatic water resistance or wall water-penetration testing; project requirements vary Continuous water-resistive barrier, integrated flashing, shingle-lapped joints, sealed penetrations, and a drainage cavity where appropriate Membrane performance is only effective when transitions, windows, doors, and penetrations are correctly integrated.
Below-grade walls or areas subject to hydrostatic pressure Provide waterproofing and protect insulation from ground moisture Low-permeance waterproofing layer Specify resistance to hydrostatic pressure, crack bridging, puncture, and soil-contact exposure according to the project standard Continuous waterproofing membrane with protected joints, robust detailing, drainage, and compatible insulation Waterproofing is different from a basic vapor retarder. Provide drainage and protection boards where required by soil and installation conditions.
Roof assembly with limited drying potential Control air leakage and vapor diffusion without creating concealed condensation risk Project-specific; often variable-perm Use a hygrothermal calculation to assess temperature, relative humidity, vapor permeance, and drying direction Continuous air barrier, properly located vapor control, durable flashing, and compatible insulation layers Consider roof color, solar exposure, interior humidity, ventilation, insulation ratio, and the permeability of roof coverings and decks.
Facade requiring temporary weather protection during construction Provide temporary resistance to rain and wind before cladding installation Typically vapor-open Ultraviolet exposure limits commonly range from approximately 30 to 180 days, depending on the membrane and project conditions UV-stable surface, tear resistance, secure fastening, compatible tapes, and clearly stated exposure limits Never assume a membrane can remain exposed indefinitely. Install the cladding within the stated exposure period.
High-wind, coastal, or mechanically stressed locations Maintain air, water, and vapor control under movement and pressure Select according to assembly analysis Review tensile strength, tear resistance, fastener retention, seam strength, and air leakage at the specified pressure Reinforced membrane, durable fastening system, compatible primers and tapes, and tested transition details Salt exposure, wind pressure, substrate movement, and installation temperature can affect long-term performance.
Renovation of a solid masonry wall Manage rain absorption, interior humidity, and drying of existing masonry Usually vapor-open Permeance should be evaluated together with masonry moisture content, insulation location, and interior finishes Exterior drainage and air-control layer that does not unnecessarily block outward drying Investigate existing moisture sources, freeze-thaw exposure, interior coatings, and historic fabric before adding a low-permeance membrane.
Reference guide: Vapor-permeance classes are commonly defined as Class I at 0.1 US perm or less, Class II above 0.1 to 1.0 US perm, and Class III above 1.0 to 10 US perms. Actual membrane performance, installation limits, and code requirements vary by product and jurisdiction. Always verify the complete assembly using local regulations, tested details, and project-specific hygrothermal analysis where necessary.

Comparing Membrane Types, Materials, and Performance Ratings

How to Choose the Right Insulation Membrane?

Membrane choice depends on moisture, temperature, and installation conditions. A vapor-control membrane slows indoor moisture from entering insulation. A breathable membrane allows trapped vapor to escape outside. Waterproof membranes resist rain and ground moisture, but they may restrict drying. Common materials include polyethylene, polypropylene, bitumen, polyurethane, and synthetic rubber. Each material balances flexibility, durability, adhesion, and vapor resistance differently.

During site inspections, I have seen excellent insulation fail because seams were poorly sealed. I once focused too heavily on thickness and overlooked drying potential. That was a useful mistake. Check vapor permeance, water-pressure resistance, tensile strength, UV exposure limits, and fire classification. Do not treat an R-value as a membrane rating. R-value measures thermal resistance, while membrane ratings describe moisture and physical performance. Product data should include test methods, not vague claims.

Tips: Match the membrane to your climate and wall design. Use a high-permeance layer where assemblies need outward drying. Choose stronger materials for foundations or exposed roofs. Confirm compatibility with insulation, sealants, and fasteners. Inspect every overlap and penetration. Small gaps can create large moisture problems. When ratings conflict, ask an independent building professional to review the assembly. Structural details vary, so a simple rule may fail.

Checking Installation Methods, Compatibility, and Long-Term Durability

How to Choose the Right Insulation Membrane?

Installation quality often matters more than the membrane’s headline performance. The 2023 Global Status Report for Buildings and Construction estimates that buildings consume about 34% of global energy and produce 37% of energy- and process-related emissions. A poorly sealed membrane can waste the value of otherwise effective insulation.

Check the installation method before checking the product label. On site, installers should create continuous laps, press tapes firmly, and seal every pipe, cable, and corner. A 100-millimetre overlap may be specified, but the manufacturer’s tested detail remains decisive. Use compatible primers, tapes, and sealants. Mixing materials casually can cause adhesive failure after temperature changes. It happens.

Compatibility also depends on moisture movement. In cold climates, vapor control usually belongs toward the warm interior side. In hot or humid climates, the safest position may differ. Hygrothermal modeling should test seasonal drying, not just winter condensation. Standards such as ASTM E2357 can support whole-building air-leakage evaluation, while field pressure testing reveals weak junctions.

Durability requires evidence beyond a laboratory rating. Look for aging, UV exposure, temperature cycling, and tensile-strength data. The IEA’s 2023 buildings analysis links efficiency improvements with lower energy demand, but performance depends on details that remain intact. A membrane exposed behind unfinished cladding may degrade sooner than expected. Site records, photographs, and follow-up inspections make claims more reliable. Ageing is easy to underestimate.

Selecting the Best Insulation Membrane for Your Project Budget

Choosing an insulation membrane begins with the project budget, not the product shelf. A low purchase price can hide extra labor, waste, or repairs. Review the wall or roof assembly, climate, moisture exposure, and required thermal performance. Then compare membranes by cost per installed square meter. For a 100-square-meter roof, even small price differences can become significant. Request tested data for vapor permeability, tensile strength, fire classification, and service temperature. Details matter.

For a tight budget, calculate the full installation cost. A lightweight membrane may reduce handling time, but it can tear around fasteners. A stronger option may cost more initially and prevent replacement during construction. Check overlap requirements, compatible tapes, primers, and protection layers. Small accessories can consume a surprising share of the allowance. Costs shift quickly. During one renovation, an affordable membrane required difficult detailing, increasing labor by nearly a day. That estimate should have been challenged earlier.

Choose performance that matches actual risk. An expensive high-performance membrane is not automatically the best choice. Likewise, the cheapest layer may fail when condensation control matters. Compare independent test documentation and clear installation guidance. Confirm local code requirements with a qualified building professional. Leave room for waste, weather delays, and small design changes. Do not guess. A practical budget includes maintenance and expected service life, not only the invoice.

Translate »